A customer experience (CX) journey map can be created by predicting the respective behaviours of different personas, based on data collected by research, and it’s one of the most effective tools in UX design. In this post, we’ll take a look at the CX journey mapping process in 9 steps by using basic concepts.
While mapping customers’ relationships with a brand or its products and services, it is necessary to define the milestones of a CX journey – that is, to identify some specific constants. These touchpoints can be scaled up to accommodate various needs, but any and every customer experience journey map must include the five assessment criteria shown below as a base.
a

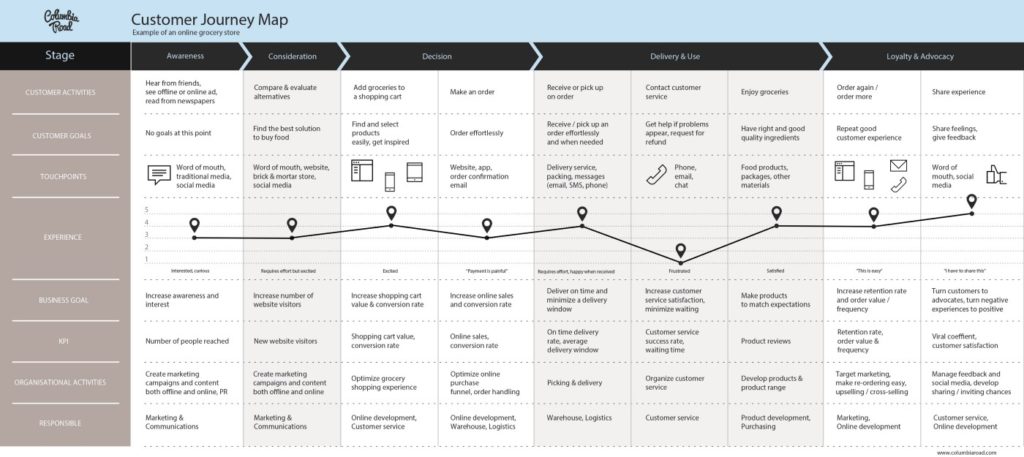
Example of a customer experience journey map
What is the difference between customer experience (CX) and customer journey?
Customer experience (CX) can be either pointing out the whole lifecycle of the user or in regards to just one touchpoint with a product/service. However, the customer journey is a presentment of the touchpoints a customer engage with a brand. Then, what are the five steps to map the customer journey?
a
Nielsen Norman Group: Customer journey mapping
- Timeline: Important turning points that map the changes in customer relations with the brand over time.
- Personas: Half-imaginary characters, typifying basic personal features of a wider customer group, based on data collected from user research, combined with web analytics.
- Emotion: Symbolic representation on the mood line of a customer’s emotional landscape at the moment of interaction.
- Channels: Entire vehicles of customer interaction and touchpoints with the brand.
- Touchpoints: Any and every moment of customer actions and interactions with the organisation or its products.
After defining the basics, it’s time to observe the customer experience flow and illustrate it as a roadmap. Megan Grocki, Experience Strategy Director at Mad*Pow, explains the nine key steps of designing a CX journey map in a video she prepared for UX Mastery.
a
How to create a customer journey map
In summary, here’s how we can repeat these nine steps, which visually form the crest of a wave.
So, how to create a customer journey map?
1. Review the goals
Consider the goals of the CX journey mapping process, as well as the goals of the organisation and its product or service.
2. Gather research
Conduct research based on relevant resources, including both qualitative and quantitative findings, and gather the results together.
3. Define channels and touchpoints
Work on determining channels and touchpoints where your customer will interact with your organisation, product or service.
4. Create an empathy map
To understand your customer’s emotional landscape, focus on what s/he is thinking, feeling, seeing, hearing, saying and doing.
5. Look at it from different perspectives
Practise generating ideas quickly by looking at problems and scenarios from different perspectives.
6. Create an affinity diagram
Organise your ideas visually, and classify and categorise them cohesively.
7. Sketch the customer journey
Draw a sketch of the CX journey map to make it comprehensible for your team.
8. Refine and digitalise
Create a digital map to help clarify any confusing details from the sketch.
9. Share and put in use
Now you are ready to take a journey through the eyes of your customer.
Lastly, it would help if you remember that customer journey maps need to be updated as conditions change since they are based on existing data and personal experiences. For this very reason, no CX journey map can be accurate forever and applied in different instances in different stages of a project. In other words, each CX journey map is as unique as each customer of an organization. Therefore, you should –not only today but always– keep your data and data processing up-to-date to know your customers better.
Customer journey maps examples
An example of a B2C customer journey map.
a

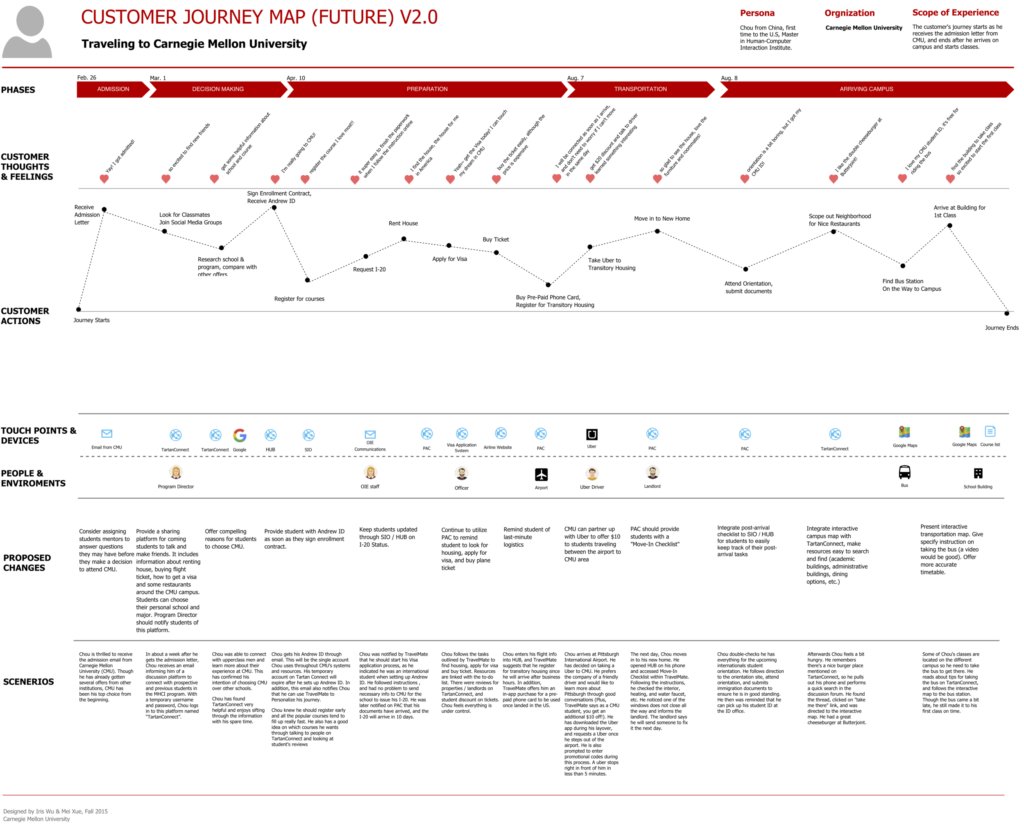
Customer journey map example (Source: Iris Tong Wu)
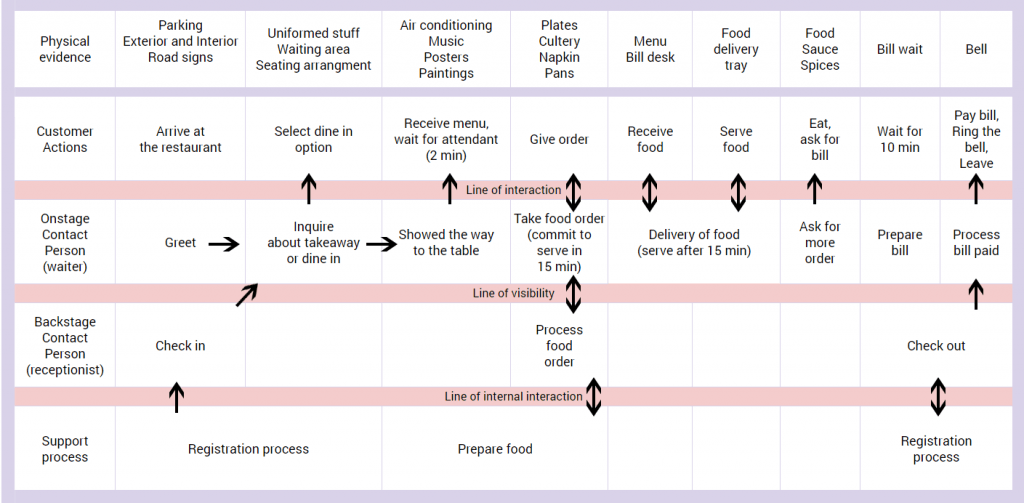
An example of a retail customer journey map.
a

Customer journey map example (Source: UXPressia)
